ALPHA-NUMERIC ROUTE NUMBERING FOR NSW
It is here (it really, really is)!
Well, finally, it is here - alpha-numeric route numbering has arrived in New South Wales. The system was officially announced on 27 September 2012 by the Minister for Roads, Duncan Gay, with the rollout to commence in March 2013 and be completed by the end of 2013. RMS has also launched a website with plenty of explanatory information on the new system - confirming a few things we've known for some time, as well as introducing a few surprises. Here's the introductory youtube video from RMS:
Follow the links below to find out all about the new scheme or read my summary below:
-
RMS website - 'Alpha numeric route numbers - A new road numbering system'. Contains maps of the entire system.
-
Media Release - Duncan Gay, 27 September 2012
-
Sydney Morning Herald report - 'Ms and Bs to make driving simple as ABC: minister'
Some surprises:
-
Hunter Expressway will be signed as M15, with route 15 continuing east to Newcastle (via Newcastle Link Road) as A15. This replaces A46 which was the number previously allocated to Newcastle Link Road, Thomas Street, Newcastle Road, Griffiths Road, Donald Street and Parry Street. The New England Highway, from Branxton to Hexham, will become part of route A43.
-
B89 is a new route from the M1 Pacific Motorway at West Wallsend, via Cardiff and Warners Bay to Belmont. Previously this section of road was not going to have a route number.
-
B23 will follow the existing National Route 23 from via Cooma and Bombala to the Victorian Border. Signage was erected in recent years showing B23 going to Jindabyne and the Nimmitabel-Bombala section as B80.
-
ACT will be converting to alpha-numerics at the same time NSW does. Route numbering is generally as per the current situation, except Alt-NR23 will receive the M23 designation. Further information can be found on the ACT alpha-numeric route numbering page (coming soon).
Some praise:
-
There is a substantial amount of information being provided to the public, enabling an easy understanding of the new system. Much better than the 'change things and don't tell anyone' situations that occurred with the existing shielded system.
-
The decision to keep B23 along the current NR23 corridor to link with B23 in Victoria is a great move.
...and some criticism:
-
Duplexes (where two routes shared a common section of road) are not shown properly on the maps and this may lead to confusion with map makers, if not the general public.
-
B12 (currently ending at Tooleybuc) is not continued into New South Wales to fill a missing link in a well used Sydney-Adelaide route.
-
There is no mention of B400 on the maps, where it heads into NSW at Robinvale. RMS has recently (late 2012) replaced signs at the junction with Sturt Highway and not included B400 route markers - moronic!
-
B91 will terminate 3km south of the QLD border, with no route marker connecting to NR13 in Queensland
-
No route number is provided for Putty Road.
-
The data being provided to map makers and other interested parties contains a number of inconsistencies with what is shown on signs and shown on the public maps. This will no doubt lead to mapping errors.
RMS are currently seeking feedback on the proposals from stakeholders and the general public - I strongly suggest you take the opportunity to offer your thoughts on the system, either as a whole or on individual routes. Feedback can be submitted via the RMS website. With your help, we might get such stupidity as the B12 situation fixed.
Below is a gallery of alpha-numeric signage that I, and others, have been able to photograph since 2004. With the rollout imminent, no doubt there will be more and more signage uncovered. Please keep sending photos of the new signs as they are uncovered.
Timeline
May 1997: All State Ministers for Roads/Transport agree to the principles for a national approach to alpha-numeric route numbering, to be implemented on a consistent basis by each jurisdiction in accordance with State priorities.
2000: RTA carries out market research on route numbering and wayfinding in general. This work forms the basis of improvements to signposting in NSW, encompassing the alpha-numeric route marking scheme.
February 2001: The first alpha-numeric ready signs (that I know of) are installed at the intersection Donald St, Selma St & Gordon Ave, Newcastle West.
December 2005: Westlink M7 opened to traffic on 16 December with alpha-numeric route marker signs. This suggests we may see a gradual rolling out of the alpha-numeric system beginning very soon!
2006: Personal correspondance with the RTA has indicated that alpha-numeric route marking has arrived in NSW. However, there is not currently funding to implement the entire system so M7 will remain the only officially sanctioned route for the foreseeable future.
September 2006: Route D5 has been introduced to direct traffic between the M5 (West) and the Airport Tunnel when the M5 East tunnel is closed.
January 2008: I have discovered that coverplated alpha-numeric signs at the intersection of Donald St, Selma St & Gordon Ave, Newcastle West, were installed in February 2001. This appears to be the earliest alpha-numeric installation in New South Wales.
June 2008: Tugun Bypass opened to traffic and signed as M1, including the section within NSW. RTA has confirmed that a section of M1 has officially been commissioned in NSW, running from the junction with Gold Coast Highway to the QLD Border.
March 2011: The gallery has been split into two pages to reduce loading times. Photos from 2004 through to 2009 can be viewed HERE.
20 September 2012: The unveiling must be getting very close! RMS has released a video introducing the alpha-numeric route marking system.
27 September 2012: The alpha-numeric route numbering scheme was officially announced by the Minister for Roads, Duncan Gay. Roads and Maritime Services (RMS) has also launched a website containing plenty of information on the scheme.
March 2013: The first alpha-numeric route to be unveiled is B73, which is signposted in a rather poor fashion with a combination of badly fitted coverplates.
April 2013: Time Cole reports that B72 is extensively signposted between Cooma and Tumut
NOTE: This page is no longer being updated - see the main NSW Alpha-Numeric Routes page for the gradual rollout of galleries for each individual route.
Thank you to everyone who has contributed their photos of exposed alpha-numeric route markers over the past 9 years.
Photos of alpha-numeric route markers in NSW, 2010 to 2012
 |
A31 route marker uncovered on a RD sign, southbound on Hume Highway from the Sturt Highway junction near Tarcutta. Photo taken: April 2010. |
 |
A31 route marker uncovered on a fingerboard sign at the intersection of Hume Highway & Toonga Settlement Rd, 5km north of Tarcutta. Photo taken: April 2010. |
 |
A31 route marker uncovered on a fingerboard sign at the intersection of Hume Highway & Toonga Settlement Rd, 5km north of Tarcutta. Photo taken: April 2010. |
 |
A31 route marker uncovered on a fingerboard sign at the intersection of Hume Highway & Lower Tarcutta Rd, 5km north of Tarcutta. Photo taken: April 2010. |
 |
A31 route marker uncovered on a fingerboard sign at the intersection of Hume Highway & Lower Tarcutta Rd, 5km north of Tarcutta. Photo taken: April 2010. |
 |
A31 route marker uncovered on a fingerboard sign at the intersection of Hume Highway & Keajura Rd, 10km south of Tarcutta. Photo taken: April 2010. |
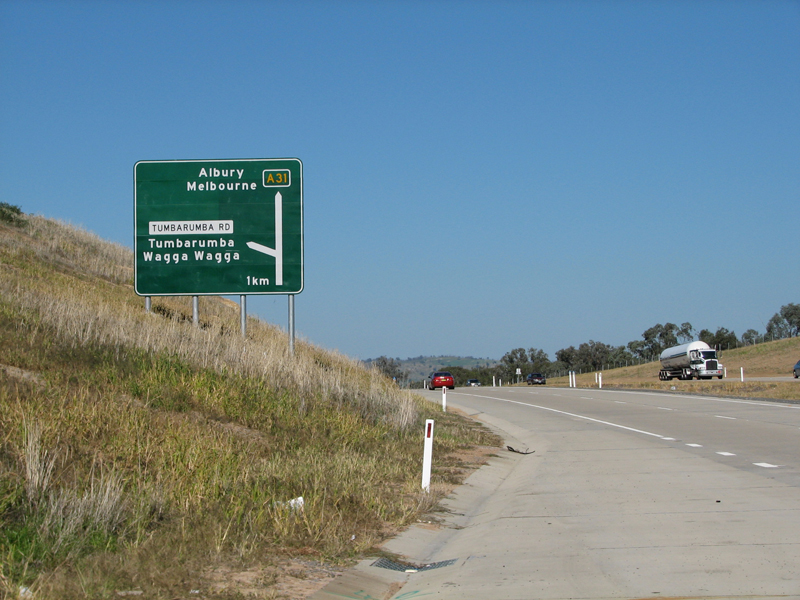 |
A31 route marker uncovered on an AD sign, southbound on Hume Highway approaching the Tumbarumba Rd interchange at Kyeamba. Photo taken: April 2010. |
 |
A31 route marker uncovered on a RD sign, nothbound on Hume Highway after the Tumbarumba Rd interchange at Kyeamba. Photo taken: April 2010. |
 |
A31 route marker uncovered on an AD sign, westbound on Tumbarumba Rd at the junction with Hume Highway, Kyeamba. Photo taken: April 2010. |
 |
A31 route marker uncovered on an ID sign, westbound on Tumbarumba Rd at the junction with Hume Highway, Kyeamba. Photo taken: April 2010. |
 |
A31 route marker uncovered on an ID sign, eastbound on Tumbarumba Rd at the junction with Hume Highway, Kyeamba. Photo taken: April 2010. |
 |
A31 route marker uncovered on an AD sign, eastbound on Tumbarumba Rd at the junction with Hume Highway, Kyeamba. Photo taken: April 2010. |
 |
A31 route marker uncovered on an AD sign, westbound on Tumbarumba Rd at the junction with Hume Highway, Kyeamba. Photo taken: April 2010. |
 |
A31 route marker uncovered on an AD sign, eastbound on Tumbarumba Rd at the junction with Hume Highway, Kyeamba. Photo taken: April 2010. |
 |
A31 route marker uncovered on an ID sign, eastbound on Tumbarumba Rd at the junction with Hume Highway, Kyeamba. Photo taken: April 2010. |
 |
A31 route marker uncovered on an ID sign, on the northbound on-ramp at the Hume HIghway/Tumbarumba Rd junction, Kyeamba. Photo taken: April 2010. |
 |
A31 route marker uncovered on an ID sign, westbound on Tumbarumba Rd at the junction with Hume Highway, Kyeamba. Photo taken: April 2010. |
 |
A31 route marker uncovered on an AD sign, northbound on Hume Highway approaching the Tumbarumba Rd interchange at Kyeamba. Photo taken: April 2010. |
 |
A31 route marker uncovered on a RD sign, southbound on Hume Highway after the Tumbarumba Rd interchange at Kyeamba. Photo taken: April 2010. |
 |
A31 route marker uncovered on a RD sign, northbound on Hume Highway after the junction with Little Billabong Road at Little Billabong. Photo taken: April 2010. |
 |
A31 route marker uncovered on an AD sign, southbound on Hume Highway approaching Little Billabong Road at Little Billabong. |
 |
A31 route marker uncovered on a fingerboard sign at the intersection of Hume Highway & Westby Lane, Little Billabong. Photo taken: April 2010. |
 |
A31 route marker uncovered on a fingerboard sign at the intersection of Hume Highway & Westby Lane, Little Billabong. Photo taken: April 2010. |
 |
A31 route marker uncovered on an ID sign at the intersection of Hume Highway & Little Billabong Road, Little Billabong. Photo taken: April 2010. |
 |
A31 route marker uncovered on an ID sign at the intersection of Hume Highway & Little Billabong Road, Little Billabong. Photo taken: April 2010. |
 |
A31 route marker uncovered on a fingerboard sign at the intersection of Hume Highway & Clifton Rd, north of Holbrook. Note the incorrect white-on-green name plate - this should be black-on-white! Photo taken: April 2010. |
 |
A31 route marker uncovered on a fingerboard sign at the intersection of Hume Highway & Mirrabooka Road, north of Holbrook. Photo taken: April 2010. |
 |
A31 route marker uncovered on a fingerboard sign at the intersection of Hume Highway & Mirrabooka Road, north of Holbrook. Photo taken: April 2010. |
 |
A31 route marker uncovered on a fingerboard sign at the intersection of Hume Highway & Yarra Yarra Road, north of Holbrook. Photo taken: April 2010. |
 |
A31 route marker uncovered on a fingerboard sign at the intersection of Hume Highway & Yarra Yarra Road, north of Holbrook. Photo taken: April 2010. |
 |
A31 route marker uncovered on a fingerboard sign at the intersection of Hume Highway & Rankins Lane, north of Holbrook. Photo taken: April 2010. |
 |
A31 route marker uncovered on a fingerboard sign at the intersection of Hume Highway & Rankins Lane, north of Holbrook. Photo taken: April 2010. |
 |
A31 and A41 route markers uncovered on an AD sign, southbound on Hume Highway approaching the junction with Olympic Highway near Table Top. Photo taken: April 2010. |
 |
A31 and A41 route markers uncovered on an AD sign, southbound on Hume Highway approaching the junction with Olympic Highway near Table Top. Photo taken: April 2010. |
 |
A31 route marker uncovered on a RD sign, northbound on Hume Highway after the junction with Olympic Highway near Table Top. Photo taken: April 2010. |
 |
A41 route marker uncovered on an AD sign, southbound on Hume Highway at the junction with Olympic Highway near Table Top. Photo taken: April 2010. |
 |
A31 and A41 route markers uncovered on an AD sign, southbound on Olympic Highway approaching the junction with Hume Highway near Table Top. Photo taken: April 2010. |
 |
A31 route marker uncovered on an AD sign, southbound on Olympic Highway at the junction with Hume Highway near Table Top. Photo taken: April 2010. |
 |
A31 and A41 route markers uncovered on an AD sign, northbound on Hume Highway approaching the junction with Olympic Highway near Table Top. Photo taken: April 2010. |
 |
A31 and A41 route markers uncovered on an AD sign, northbound on Hume Highway approaching the junction with Olympic Highway near Table Top. Photo taken: April 2010. |
 |
A41 route marker uncovered on an AD sign, northbound on Hume Highway at the junction with Olympic Highway near Table Top. Photo taken: April 2010. |
 |
A31 route marker uncovered on a RD sign, southbound on Hume Highway after the junction with Olympic Highway near Table Top. Photo taken: April 2010. |
 |
A20 & A41 route markers uncovered on a diagrammatic AD sign, westbound on Sturt Highway approaching the western junction with Olympic Highway, Wagga Wagga. Source: Rick Wardle, July 2010. |
 |
A20 route marker uncovered on an RD sign, westbound on Sturt Highway near the western junction with Olympic Highway, Wagga Wagga. Source: Rick Wardle, July 2010. |
 |
M1 route marker uncovered on a toll charges information sign at the junction of Warringah Freeway & Falcon Street, Neutral Bay. Source: Michael Mak, September 2010. |
 |
M1 route marker uncovered on a toll charges information sign at the junction of Warringah Freeway & Falcon Street, Neutral Bay. Source: Michael Mak, September 2010. |
 |
B64 route marker uncovered on a fingerboard sign at the junction of Mid Western Highway & Wongalea Rd, 50km east of Hay. Source: Elizabeth Dodd, September 2010. |
 |
A43 route marker uncovered on an AD sign, northbound on Princes Highway approaching Motorway Link at Blue Haven. Photo taken: October 2010. |
 |
A1 route marker uncovered at the intersection of Princes Highway & Airport Road, Albion Park. Source: Paul Rands, October 2010. |
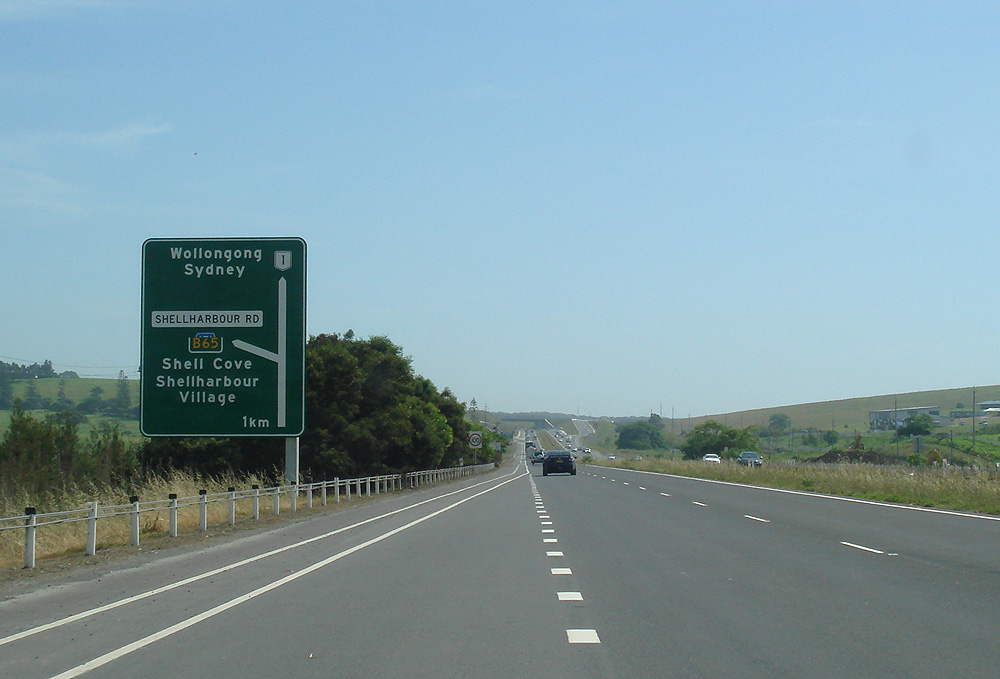 |
B65 route marker uncovered on an AD sign, westbound on Princes Highway approaching Shellharbour Road, Dunmore. Source: Paul Rands, October 2010. |
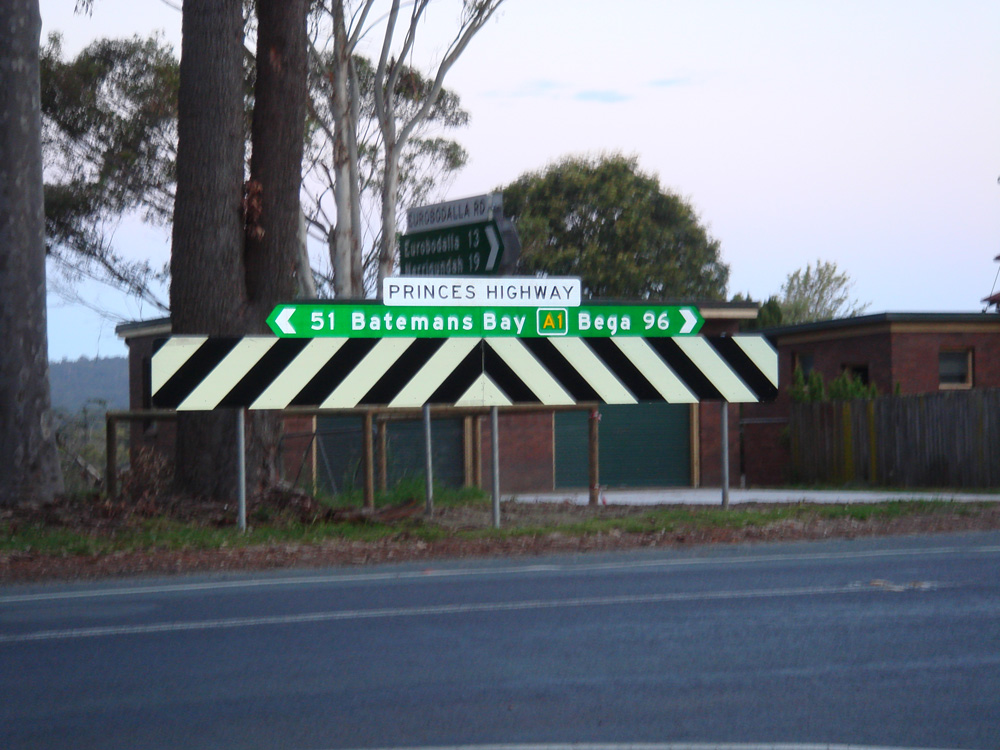 |
A1 route marker uncovered on a fingerboard sign at the intersection of Princes Highway & Eurobodalla Road, Bodalla. Source: Paul Rands, October 2010. |
 |
A1 route marker uncovered on an AD sign, southbound on Princes Highway approaching Prince Edward Street, Berry. Source: Paul Rands, October 2010. |
 |
M31 route marker uncovered on an AD sign, southbound on Hume Highway at St Andrews. |
 |
B94 route marker uncovered on an AD sign, westbound on Hume Highway approaching the Burley Griffin Way junction, west of Bowning. Source: Rob Tilley, November 2010. |
 |
B72 route marker uncovered on a fingerboard sign at the intersection of Snowy Mountains Highway & Jounama Dam Road, Talbingo. Source: Rob Tilley, November 2010. |
 |
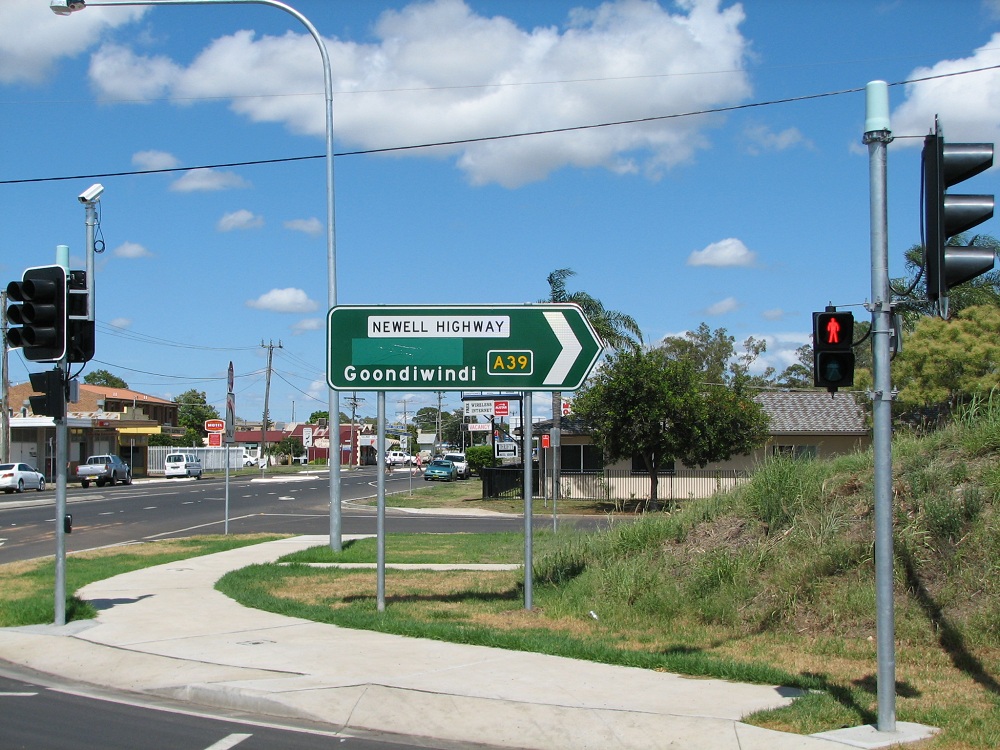
A39 route marker uncovered on an ID sign on Newell Highway at the junction with Main Road No. 248 (the Wagga Wagga - Ardlethan road) near Ardlethan. Source: Rob Tilley, November 2010. |
 |
A39 route marker uncovered on a fingerboard sign at the intersection of Newell Highway & Storms Lane, 26km south of West Wyalong. Source: Rob Tilley, November 2010. |
 |
A39 route marker uncovered on a fingerboard sign at the intersection of Newell Highway & Gospers Lane, 2km north of Peak Hill. Source: Rob Tilley, November 2010. |
 |
A39 route marker uncovered on a fingerboard sign at the intersection of Newell Highway & Hargraves Lane, 2km south of Gilgandra. Source: Rob Tilley, November 2010. |
 |
A39 route marker uncovered on a fingerboard sign at the intersection of Newell Highway & Hickeys Road, 56km north of Gilgandra. Source: Rob Tilley, November 2010. |
 |
A39 route marker uncovered on a fingerboard sign at the intersection of Newell Highway & Cenn Cruaich Road, 57km north of Gilgandra. Source: Rob Tilley, November 2010. |
 |
A1 route marker uncovered on an AD sign, southbound on Old Princes Highway at the junction with Southern Freeway, Waterfall. Source: Michael Mak, December 2010. |
 |
M1 route marker uncovered on an ID sign, northbound on Pennant Hills Road at the junction with Sydney-Newcastle Freeway, Wahroonga. |
 |
A48 route marker uncovered on an RD sign, westbound on Illawarra Highway at the junction with Pearsons Lane near Robertson. Source: Dean Pryke, April 2010. |
 |
A48 route marker uncovered on an ID sign at the intersection of Illawarra Highway & Meryla Street, Robertson. Source: Dean Pryke, April 2010. |
 |
A44 route marker uncovered on an AD sign on Great Western Highway approaching Prospect Highway, Prospect. Source: Brad Torr, December 2010. |
 |
A15 route marker uncovered on an ID sign at the intersection of New England Highway & Kamilaroi Highway, north of Willow Tree. Photo taken: December 2010. |
 |
A15 route marker uncovered on an AD sign at the intersection of New England Highway & the access road to the Equine & Livestock Centre, Tamworth. Photo taken: December 2010. |
 |
A15 route marker uncovered on an AD sign at the intersection of New England Highway & the access road to the Equine & Livestock Centre, Tamworth. Photo taken: December 2010. |
 |
A15 route marker uncovered on an ID sign at the intersection of New England Highway & the access road to the Equine & Livestock Centre, Tamworth. Photo taken: December 2010. |
 |
A39 route marker uncovered on an AD sign on Newell Highway at the northern end of the new Moree Town Centre Bypass. Photo taken: January 2011. |
 |
A39 route marker uncovered on an AD sign on Newell Highway at the northern end of the new Moree Town Centre Bypass. Photo taken: January 2011. |
 |
B76 route marker uncovered on an AD sign, southbound on the new alignment of Newell Highway approaching Gwydir Highway (Alice Street), Moree. Photo taken: January 2011. |
 |
A39 route marker uncovered on an RD sign, northbound on the new alignment of Newell Highway at Moree. Photo taken: January 2011. |
 |
A39 & B76 route markers uncovered on an AD sign, southbound on the new alignment of Newell Highway approaching Gwydir Highway (Alice Street), Moree. Photo taken: January 2011. |
 |
A39 & B76 route markers uncovered on ID signs at the intersection of Gwydir Highway & the new alignment of Newell Highway, Moree. Photo taken: January 2011. |
 |
A39 route marker uncovered on an ID sign at the intersection of Gwydir Highway & the new alignment of Newell Highway, Moree. Photo taken: January 2011. |
 |
A39 route marker uncovered on an ID sign at the intersection of Gwydir Highway & the new alignment of Newell Highway, Moree. Photo taken: January 2011. |
 |
A39 & B76 route markers uncovered on an AD sign assembly, westbound on Gwydir Highway approaching the new alignment of Newell Highway, Moree. Photo taken: January 2011. |
 |
A39 & B76 route markers uncovered on an AD sign, eastbound on Gwydir Highway approaching the new alignment of Newell Highway, Moree. Photo taken: January 2011. |
 |
A39 & B76 route markers uncovered on an AD sign, westbound on Alice Street approaching the junction with Frome Street, Moree. Photo taken: January 2011. |
 |
A39 & B76 route markers uncovered on an AD sign, northbound on Frome Street approaching Alice Street, Moree. Photo taken: January 2011. |
 |
B76 route marker uncovered on an ID sign at the intersection of Frome Street & Alice Street, Moree. Photo taken: January 2011. |
 |
A39 & B76 route markers uncovered on an ID sign assembly at the intersection of Frome Street & Alice Street, Moree. Photo taken: January 2011. |
 |
A39 route marker uncovered on an ID sign assembly at the intersection of Frome Street & Alice Street, Moree. Photo taken: January 2011.. |
 |
A39 & B76 route markers uncovered on an AD sign assembly, southbound on Frome Street approaching Alice Street, Moree. Photo taken: January 2011. |
 |
A49 route marker uncovered on an RD sign, northbound on Central Coast Highway at The Entrance North. Source: Adam Sadler, January 2011. |
 |
A49 route marker uncovered on an RD sign, southbound on Central Coast Highway at Noraville. Photo taken: January 2011. |
A37 route marker uncovered on an ID sign, eastbound on Pacific Highway at Wallsend Road, Sandgate. Source: Daniel Knott, January 2011. |
|
 |
B73 route marker uncovered on an AD sign, southbound on Kangaroo Valley Road at Cambewarra Road, Cambewarra. Source: Dean Pryke, January 2011. |
 |
B73 route marker uncovered on an AD sign, northbound on Kangaroo Valley Road at Cambewarra Road, Cambewarra. Source: Dean Pryke, January 2011. |
 |
A9 route marker uncovered on an ID sign at the intersection of The Northern Road, Londonderry Road & Cranbrook Road, Londonderry. Source: Paul Mech, July 2010. |
 |
A49 route marker uncovered on an ID sign, northbound on Central Coast Highway at Tumbi Road, Wamberal. Source: Adam Sadler, April 2011. |
 |
M5 route marker uncovered on an RD sign, eastbound on the South Western Motorway near King Georges Road, Beverley Hills. Source: Michael Mak, April 2011. |
 |
A41 route marker uncovered on an RD sign, southbound on Olympic Highway near Sturt Highway, Wagga Wagga. Source: Rob Tilley, May 2011. |
 |
A31 route marker uncovered southbound on Olympic Highway, 2km north of Hume Highway. Source: Rob Tilley, May 2011. |
 |
A41 route marker uncovered on an RD sign, northbound on Olympic Highway near Boorooma Street, 5km north of Wagga Wagga. Source: Rob Tilley, May 2011. |
 |
A39 route marker uncovered on an ID sign at the intersection of Newell Highway & Carnarvon Highway, 2km north of Moree. Source: Rob Tilley, May 2011. |
 |
A1 route marker uncovered on a fingerboard sign at the intersection of Princes Highway & Nethercote Road, 2km west of Eden. Source: Paul Rands, May 2011. |
 |
A1 route marker uncovered on a fingerboard sign at the intersection of Princes Highway & Quarantine Bay Road, 3km west of Eden. Source: Paul Rands, May 2011. |
 |
A1 route marker uncovered on an AD sign, southbound on Princes Highway approaching the junction with Bermagui Road near Tilba Tilba. Source: Paul Rands, May 2011. |
 |
B62 route marker uncovered on a fingerboard sign at the junction of Bangalow-Lismore Road & Eureka Road, 12km west of Bangalow. Source: Ben Zoffman, August 2011. |
 |
B62 route marker uncovered on a fingerboard sign at the junction of Bangalow-Lismore Road & Springvale Road, 9km west of Bangalow. Source: Ben Zoffman, August 2011. |
 |
B59 route marker uncovered on an ID sign at the junction of Bells Line of Road & Comleroy Road, Kurrajong. Source: Ben Zoffman, August 2011. |
 |
B59 route marker exposed on an RD sign, westbound on Bells Line of Road near Little Wheeney Creek, Kurrajong. Source: Ben Zoffman, August 2011. |
 |
Incorrect B56 route marker exposed on a fingerboard sign at the junction of Mitchell & Oxley Highways, Nevertire. Also note the A32 route marker. Source: Paul Rands, August 2011. |
 |
A32 route markers exposed on an ID sign assembly at the junction of Barrier Highway (Marshall Street) & Barton Street, Cobar. Source: Paul Rands, August 2011. |
 |
A32 route marker exposed on an ID sign at the junction of Barrier Highway & Kidman Way, Cobar. Note that B87 should also be shown for the left turn. Source: Paul Rands, August 2011. |
 |
B59 route marker exposed on an ID sign at the entrance to Mt Tomah Botanic Gardens. Photo taken: September 2011. |
 |
A39 route marker exposed on an ID sign at the junction of Newell Highway & Main Road No. 89 (Tomingley-Narromine Road) at Tomingley. Source: Paul Rands, October 2011. |
 |
B75 route marker exposed on an RD sign, southbound on Cobb Highway, 19km north of Echuca. Source: Peter Renshaw, October 2011. |
  |
B75 route marker partially exposed on an AD sign, northbound on Cobb Highway at Crispe Street, Deniliquin. Note the word 'National' which is incorrect and should not be there. Source: Peter Renshaw, October 2011. |
 |
M31 route marker exposed on an ID sign at the junction of Hume Highway & Collector Road, Gunning. Note the 'Hume Highway' name patch is on a coverplate, presumably over 'Hume Motorway'. Source: Ben Zoffman, October 2011. |
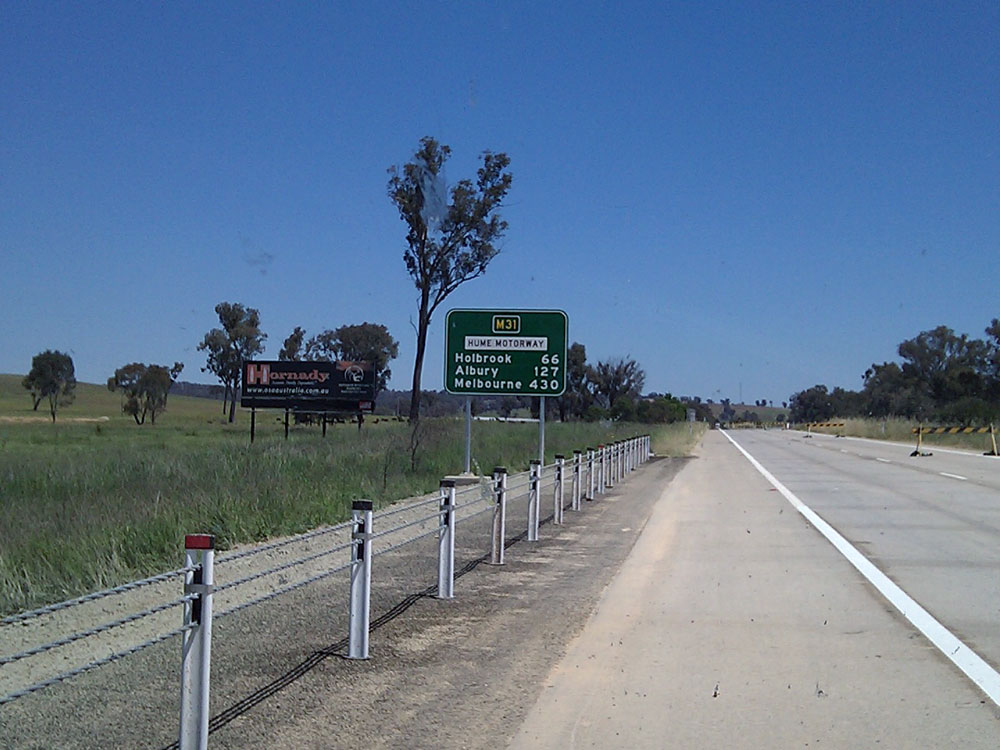 |
M31 route marker exposed on an RD sign, southbound on Hume Highway at Tarcutta. Source: Tim Cole, November 2011. |
 |
A1 route marker exposed on a fingerboard sign at the junction of Princes Highway & Tomakin Road, Mogo. Source: Peter Renshaw, November 2011. |
 |
A1 route marker exposed on an AD sign, westbound on Tomakin Road approaching the junction with Princes Highway at Mogo. Source: Peter Renshaw, November 2011. |
 |
A1 route marker exposed on a fingerboard sign at the junction of Princes Highway & Broulee Road, 7km south of Mogo. Source: Peter Renshaw, November 2011. |
 |
A1 route marker exposed on an ID sign at the intersection of Princes Highway & Hector McWilliams Drive, 14km south of Moruya. Source: Peter Renshaw, November 2011. |
 |
A49 route marker exposed on an AD sign westbound on Yakalla Street approaching Central Coast Highway at Bateau Bay. Source: Adam Sadler, November 2011. |
 |
B60 route marker exposed on an AD sign at the Teven interchange on the Ballina Bypass. I'm not sure why the NR1 coverplate has been installed but not a NR44 coverplate. Source: Lachlan Sims, December 2011. |
 |
B60 route marker exposed on an AD sign eastbound on what is soon to be the Bruxner Highway approaching the Ballina Bypass section of Pacific Highway. Note the error - B60 actually terminates at this junction and should not be shown continuing into Ballina!. Source: Lachlan Sims, December 2011. |
 |
Freshly installed and uncovered A43 route marker on a fingerboard sign at the junction of Pacific Highway & Awabakal Road, Nords Wharf. Source: Adam Sadler, February 2011. |
 |
A32 route marker uncovered on a fingerboard sign at the junction of Mitchell Highway & Dairy Creek Road, 4km east of Orange. Source: Paul Rands, February 2011. |
 |
A39 route marker uncovered on a new ID sign at the junction of Newell Highway & Warrumbungles Way, 7km south of Coonabarabran. Note the supplementary fingerboard on a brand new sign (installed since September 2011) - sloppy work from RMS as Binnaway should have been included in the ID sign. Source: Craig Crompton, February 2012. |
 |
A39 route marker exposed on a new RD sign, southbound on Newell Highway after the junction with Warrumbungles Way, 7km south of Coonabarabran. Note the absence of any focal points beyond Dubbo - this seems to be a consistent approach along Newell Highway. Source: Craig Crompton, February 2012. |
 |
A39 route marker uncovered on an RD sign, northbound on Newell Highway after the junction with Mendooran Road, 16km south of Coonabarabran. Source: Craig Crompton, February 2012. |
 |
A39 route marker uncovered on an ID sign at the junction of Newell Highway & Mendooran Road, 16km south of Coonabarabran. Source: Craig Crompton, February 2012. |
 |
Nicely designed AD sign northbound on Newell Highway approaching Mendooran Road, 16km south of Coonabarabran. Source: Craig Crompton, February 2012. |
 |
A39 route marker exposed southbound on Newell Highway, 16km south of Coonabarabran. Source: Craig Crompton, February 2012. |
 |
A1 route marker exposed on a southbound AD sign - Pacific Highway approaching Chinderah Road, Chinderah. Source: Peter Renshaw, March 2012. |
 |
B72 route marker exposed on an ID sign at the junction of Snowy Mountains Highway & Gocup Road, Tumut. Source: Kyle Threlfo, June 2012. |
 |
B64 route marker exposed on an AD sign northbound on Kidman Way approaching Mid Western Highway at Goolgowi. Source: Peter Renshaw, June 2012. |
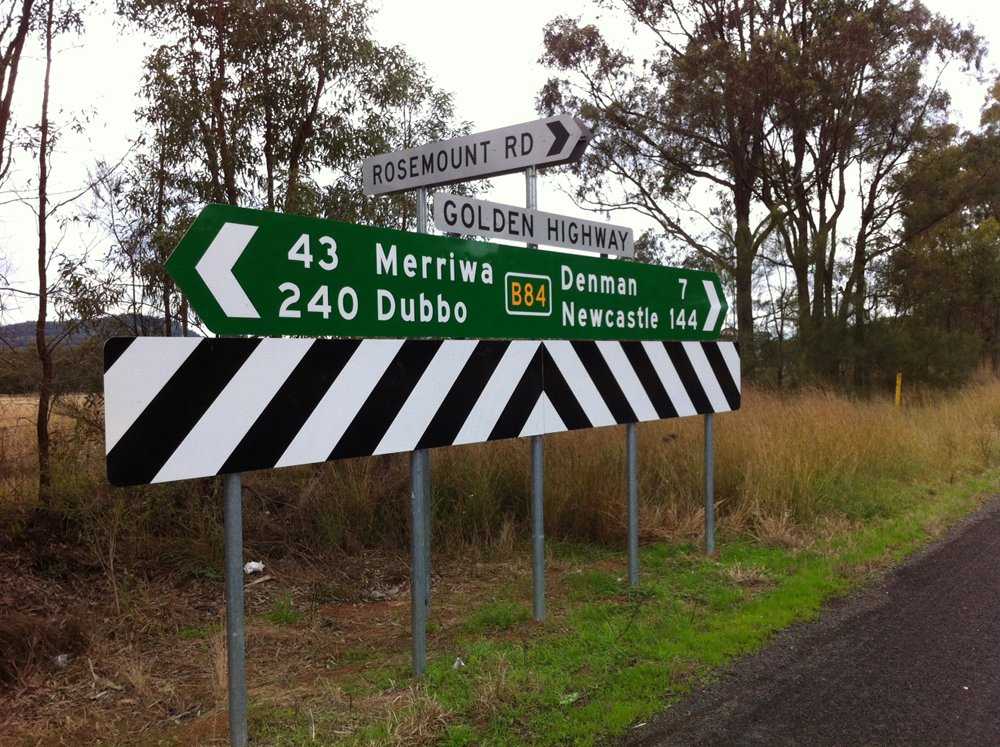 |
B84 route marker exposed on a fingerboard sign at the junction of Golden Highway & Rosemount Road, 7km west of Denman. Source: Peter Renshaw, June 2012. |
 |
A41 route marker exposed on a fingerboard sign at the junction of Mid Western Highway & Walli Road, near Woodstock, 21km east of Cowra. Source: Peter Renshaw, June 2012. |
 |
A32 and B56 route markers exposed at the junction of Mitchell & Oxley Highways, Nevertire. The B56 route marker is an error - B56 is not proposed to extend west of the junction of Newell and Oxley Highways east of Coonabarabran. Source: Peter Renshaw, June 2012. |
 |
B55 route marker exposed on a fingerboard sign at the junction of Castlereagh Highway & Nilma Road, 31km south of Walgett. Source: Peter Renshaw, June 2012. |
 |
A39 route marker exposed at the junction of Newell Highway & Killarney Gap Road, 4km north of Narrabri. Source: Peter Renshaw, June 2012. |
 |
A39 route marker exposed on an AD sign, southbound on Newell Highway approaching Killarney Gap Road, 4km north of Narrabri. The northbound AD sign is similarly uncovered, however it is difficult to get a picture due to the closeness to the rail overbridge. Source: Peter Renshaw, June 2012. |
 |
A39 route marker exposed on a fingerboard sign at the junction of Newell Highway & Smithfield Lane, 22km north of Narrabri. Source: Peter Renshaw, June 2012. |
 |
A39 route marker exposed on a fingerboard sign at the junction of Newell Highway & Valorban Lane, 41km north of Narrabri. Source: Peter Renshaw, June 2012. |
 |
A39 route marker exposed on a fingerboard sign at the junction of Newell Highway & Brigalow Lane, 44km north of Narrabri. Source: Peter Renshaw, June 2012. |
 |
A39 route marker exposed on a fingerboard sign at the junction of Newell Highway, Gurley Creek Road & Millie Road, Gurley. Source: Peter Renshaw, June 2012. |
 |
A39 route marker exposed on a fingerboard sign at the junction of Newell Highway, Gurley Creek Road & Millie Road, Gurley. Source: Peter Renshaw, June 2012. |
 |
Victorian style B79 route marker exposed at the junction of Silver City Highway, Patton Street & Bonanza Street, South Broken Hill. Interestingly, this is not the first exposed B79 sign at this intersection - the previous sign also had a gold border around the route marker. Source: Peter Renshaw, June 2012. |
 |
Another Victorian style route marker - this time a B75 on Cobb Highway, 107km north of Hay. Source: Peter Renshaw, June 2012. |
 |
B72 route marker exposed on Snowy Mountains Highway at the junction with Long Plain Road, Rules Point. Source: Richard Wardle, June 2012. |
 |
M1 route marker exposed on an ID sign at the junction of Princes Highway & Fowlers Road, Dapto. Photo taken: July 2012. |
 |
M1 route marker exposed on an ID sign at the junction of Princes Highway & Fowlers Road, Dapto. Photo taken: July 2012. |
 |
A1 route marker exposed on an ID sign at the new Frederickton Interchange on Pacific Highway, 1km north of Frederickton. Photo taken: July 2012. |
 |
A1 route marker exposed on an ID sign at the new Frederickton Interchange on Pacific Highway, 1km north of Frederickton. Photo taken: July 2012. |
 |
A1 route marker exposed on an ID sign at the new Frederickton Interchange on Pacific Highway, 1km north of Frederickton. Photo taken: July 2012. |
 |
A1 route marker exposed on an ID sign at the new Frederickton Interchange on Pacific Highway, 1km north of Frederickton. Photo taken: July 2012. |
 |
A1 route marker exposed on an ID sign at the new Frederickton Interchange on Pacific Highway, 1km north of Frederickton. Photo taken: July 2012. |
 |
A1 route marker exposed on a northbound RD sign at the new Frederickton Interchange on Pacific Highway, 1km north of Frederickton. Photo taken: July 2012. |
A40 route marker exposed on an ID sign at the junction of Victoria & Silverwater Roads, Ermington. Source: Tim Cole, July 2012. |
|
 |
M4 route marker exposed on an AD sign, westbound on the Western Motorway approaching James Ruse Drive, Auburb. Source: Musa Hodzic, July 2012. |
 |
M2 and M7 route markers exposed on an ID sign at the junction of Hills Motorway & Windsor Road, Baulkham Hills. Source: Leo Giusti, July 2012. |
 |
M2 and M7 route markers exposed on an ID sign at the junction of Hills Motorway & Windsor Road, Baulkham Hills. Source: Leo Giusti, July 2012. |
 |
B87 route marker exposed on a fingerboard sign at the junction of Kidman Way & Fleury Street, Merriwagga. Source: Richard Wardle, September 2012. |
 |
A28 route marker exposed on an AD sign northeastbound on Pennant Hills Road, approaching the junction with James Ruse Drive at North Parramatta. Source: Leo Giusti, September 2012. |
 |
M1 route marker exposed on an AD sign northbound on the new section of Pacific Highway at Banora Point. Source: Dean Pryke, September 2012. |
 |
M1 route marker exposed on an AD sign southbound on the Tugun Bypass section of Pacific Highway. Source: Dean Pryke, September 2012. |
 |
M1 route marker exposed on an AD sign northbound on the Tugun Bypass section of Pacific Highway. Source: Dean Pryke, September 2012. |
 |
A1 route marker exposed on a fingerboard sign at the junction of Pacific Highway & Glen Ora Road, 2km south of Nabiac. Source: Peter Renshaw, November 2012. |
 |
A1 route marker exposed on an AD sign northbound on Pacific Highway approaching the junction with Failford Road, 5km north of Nabiac. Source: Peter Renshaw, November 2012. |
 |
B78 route marker exposed on a new fingerboard sign at the junction of Waterfall Way & Dome Rd, 2km east of Dorrigo. Source: Peter Renshaw, November 2012. |
 |
B55 route marker exposed on a fingerboard sign at the junction of Castlereagh Highway & Wingadee Road, 31km north of Coonamble. Source: Peter Renshaw, November 2012. |
 |
A39 route marker exposed on a fingerboard sign at the junction of Newell Highway & Tyrone Road, 19km south of Moree. Source: Peter Renshaw, November 2012. |
 |
A39 route marker exposed on an AD sign, westbound on Oxley Highway approaching the junction with Newell Highway near Coonabarabran. Source: Peter Renshaw, November 2012. |
 |
B56 route marker exposed on a RD sign, eastbound on Oxley Highway after the junction with Newell Highway near Coonabarabran. Source: Peter Renshaw, November 2012. |
 |
A39 route marker exposed on an ID sign at the junction of Newell & Oxley Highways, 5km north of Coonabarabran. Source: Peter Renshaw, November 2012. |
 |
A39 route marker exposed on a RD sign northbound on Newell Highway after the junction with Oxley Highway, 5km north of Coonabarabran. Source: Peter Renshaw, November 2012. |
 |
A39 and B56 route markers exposed on an AD sign southbound on Newell Highway approaching the junction with Oxley Highway, 5km north of Coonabarabran. Source: Peter Renshaw, November 2012. |
 |
A39 and B56 route markers exposed on ID signs at the junction of Newell & Oxley Highways, 5km north of Coonabarabran. Source: Peter Renshaw, November 2012. |
 |
A39 route marker exposed on an ID sign at the junction of Newell & Oxley Highways, 5km north of Coonabarabran. Source: Peter Renshaw, November 2012. |
 |
A39 and B56 route markers exposed on an AD sign, northbound on Newell Highway approaching the junction with Oxley Highway, 5km north of Coonabarabran. Source: Peter Renshaw, November 2012. |
 |
A39 route marker exposed on a RD sign southbound on Newell Highway after the junction with Oxley Highway, 5km north of Coonabarabran. Source: Peter Renshaw, November 2012. |
 |
A39 route marker exposed on a fingerboard sign at the junction of Newell Highway & Nashs Road, 32km south of Coonabarabran. Source: Peter Renshaw, November 2012. |
 |
A39 route marker exposed on a fingerboard sign at the junction of Newell Highway & Gowang Road, 33km south of Coonabarabran. Source: Peter Renshaw, November 2012. |
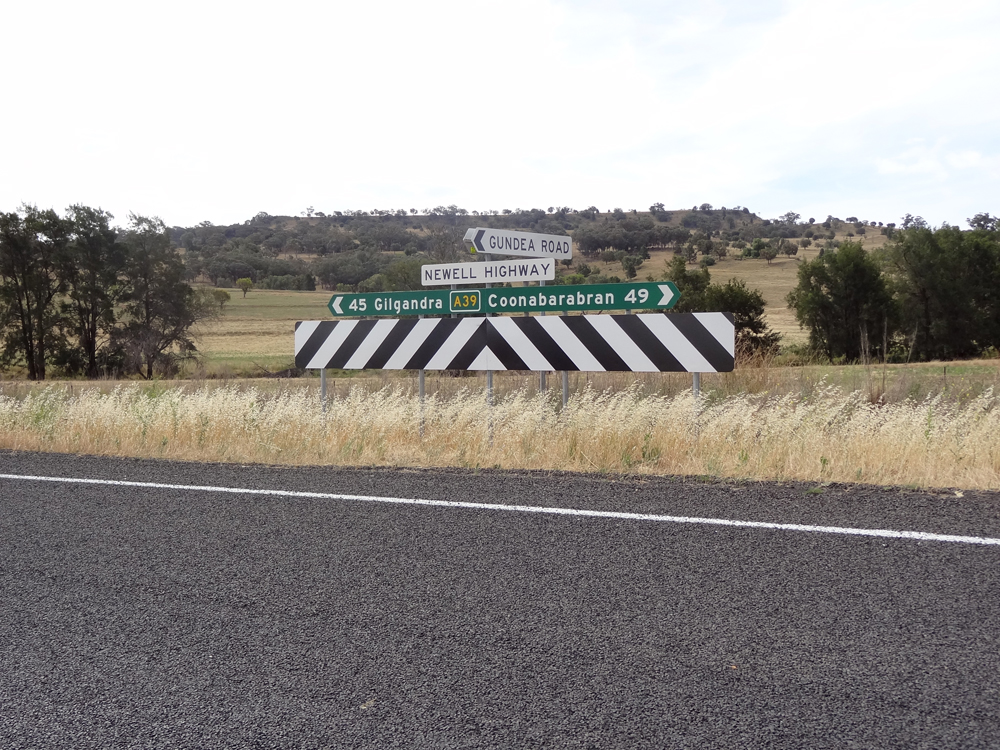 |
A39 route marker exposed on a fingerboard sign at the junction of Newell Highway & Gundea Road, 49km south of Coonabarabran. Source: Peter Renshaw, November 2012. |
 |
A39 route marker exposed on a fingerboard sign at the junction of Newell Highway & O'Conners Road, 49km south of Coonabarabran. Source: Peter Renshaw, November 2012. |
 |
A39 route marker exposed on a fingerboard sign at the junction of Newell Highway & Biddon-Bearbung Road, 71km south of Coonabarabran. Source: Peter Renshaw, November 2012. |
 |
A39 route marker exposed on a fingerboard sign at the junction of Newell Highway & Creenaunes Lane, 13km south of Coonabarabran. Source: Peter Renshaw, November 2012. |
 |
A39 route marker exposed on an ID sign at the junction of Newell Highway (Sherriff Street) & Camp Street, Forbes. Source: Peter Renshaw, November 2012. |
 |
B64 route marker exposed on a fingerboard sign at the junction of Mid Western Highway & Weja Road, 11km east of Wethalle. Source: Peter Renshaw, November 2012. |
 |
B64 route marker exposed on an AD sign westbound on Mid Western Highway approaching the junction with the Rankin Springs-Lake Cargelligo road at Rankins Springs. Source: Peter Renshaw, November 2012. |
 |
A41 route marker exposed on a fingerboard sign at the junction of Mid Western Highway & Carcoar Dam Road, 47km west of Bathurst. Source: Paul Rands, December 2012. |
 |
B79 route marker uncovered on a fingerboard sign at the junction of Silver City Highway & Milpara Road, 26km north of Wentworth. Source: Peter Renshaw, January 2013. |
 |
B79 route marker uncovered on a fingerboard sign at the junction of Silver City Highway & High Darling Road, 16km north of Wentworth. Source: Peter Renshaw, January 2013. |
 |
A20 route marker uncovered on a fingerboard sign at a rest area, 41km east of Mildura. Source: Peter Renshaw, January 2013. |
 |
A20 route marker uncovered on a fingerboard sign, 20km east of Euston. Source: Peter Renshaw, January 2013. |
 |
B64 route marker uncovered on a fingerboard sign at the junction of Mid Western Highway & Murrumbidgee River Road, 16km east of Hay. Source: Peter Renshaw, January 2013. |
 |
B64 route marker uncovered on a fingerboard sign at the junction of Mid Western Highway & Booligal Road, Gunbar. Source: Peter Renshaw, January 2013. |
 |
B64 route marker uncovered on a slightly dodgily designed RD sign eastbound on Mid Western Highway as you leave Goolgowi. Source: Peter Renshaw, January 2013. |
 |
B64 route marker uncovered on a slightly dodgily designed AD sign eastbound approaching Rankins Springs Road, 14km west of Rankins Springs. Source: Peter Renshaw, January 2013. |
 |
B64 route marker uncovered on a slightly dodgily designed AD sign westbound approaching Rankins Springs Road, 14km west of Rankins Springs. Source: Peter Renshaw, January 2013. |
 |
B64 route marker uncovered on an RD sign westbound on Mid Western Highway at Rankins Springs. Source: Peter Renshaw, January 2013. |
 |
B64 route marker exposed on a fingerboard sign at the junction of Mid Western Highway & Paynes Road, 36km west of West Wyalong. Note the non-standard focal points. Source: Peter Renshaw, January 2013. |
 |
A39 route marker exposed on an ID sign at the junction of Newell Highway & Tallimba Road, 3km south of West Wyalong. Source: Peter Renshaw, January 2013. |
 |
A39 route marker exposed on an ID sign at the junction of Newell Highway & Tallimba Road, 3km south of West Wyalong. Source: Peter Renshaw, January 2013. |
 |
A39 route marker exposed on a fingerboard sign at the junction of Newell Highway & Golden Hills Road, 42km south of West Wyalong. Source: Peter Renshaw, January 2013. |
 |
A39 route marker exposed on a fingerboard sign at the junction of Newell Highway & Gardeners Lane, 42km south of West Wyalong. Source: Peter Renshaw, January 2013. |
 |
A39 route marker exposed on a fingerboard sign at the junction of Newell Highway & Mirrool Waste Station Road, 45km south of West Wyalong. Source: Peter Renshaw, January 2013. |
 |
A39 route marker exposed on a fingerboard sign at the junction of Newell Highway & McLeans Lane, 46km south of West Wyalong. Source: Peter Renshaw, January 2013. |
 |
A39 route marker exposed on a fingerboard sign at the junction of Newell Highway & Gawnes Road, 118km south of West Wyalong. Source: Peter Renshaw, January 2013. |
 |
A39 route marker exposed on a fingerboard sign at the junction of Newell Highway & Connells Road, 121km south of West Wyalong. Source: Peter Renshaw, January 2013. |
 |
A39 route marker exposed on a fingerboard sign at the junction of Newell Highway & Charles Road, 124km south of West Wyalong. Source: Peter Renshaw, January 2013. |
 |
A39 route marker exposed on a fingerboard sign at the junction of Newell Highway & Norderns Road, 129km south of West Wyalong. Source: Peter Renshaw, January 2013. |
 |
A39 route marker exposed on a fingerboard sign at the junction of Newell Highway & Bundidgerry Road, 132km south of West Wyalong. Source: Peter Renshaw, January 2013. |
 |
M1 route marker and 'Pacific Motorway' route name exposed on an ID sign at the Ourimbah Interchange. This sign was struck by an errant truck full of scrap metal. Source: Adam Sadler, February 2013. |
 |
M2 route marker exposed on an ID sign at the junction of Talavera Rd, Herring Rd & the M2 ramps at Macquarie Park. Source: Hubert Lam, February 2013. |
 |
'Pacific Mwy' road name uncovered on an AD sign at the recently reconstructed Tuggerah Interchange. Source: Matt Barker, February 2013. |
 |
M2 route marker exposed on an AD sign on Epping Road approaching the junction with Herring Road, Macquarie Park. Source: Richard Ho, February 2013. |
 |
Exposed M1 and B74 route markers on an AD sign at Tuggerah Interchange. Source: Matt Barker, March 2013. |
 |
Exposed A32 route markers on an AD sign on Hawkesbury Road, approaching Great Western Highway, Springwood. Source: Craig Crompton, March 2013. |
 |
Exposed M1 route marker on an AD sign, westbound on Wyong Road approaching Pacific Motorway, Tuggerah. Source: Adam Sadler, March 2013. |
 |
Exposed M2 route marker on an AD sign, westbound on Epping Road approaching Herring Road, North Ryde. Source: Brendan Terrett, April 2013. |
 |
Newly installed A36 'topknot' on an ID sign that was for some reason designed without a route marker. Princes Highway/Bay St intersection, Rockdale. Source: Brendan Terrett, April 2013. |
 |
Newly installed A36 'topknot' on an ID sign that was for some reason designed without a route marker. Princes Highway/Bay St intersection, Rockdale. Source: Brendan Terrett, April 2013. |
 |
Exposed B74 route marker southbound on Pacific Motorway (nee Sydney-Newcastle Freeway) approaching the junction with Wyong Road, Tuggerah. Source: Matt Barker, April 2013. |
Last updated 18 November 2013 © Ozroads 2003-2013. |